Predicting peak fall foliage in Quebec isn’t about calendar dates; it’s about scientifically reading the biological and atmospheric signs the trees send out.
- Elevation and microclimates create a staggered timeline, with mountains turning color up to 7-10 days earlier than valleys due to temperature and stress triggers.
- Weather is a double-edged sword: high winds can strip leaves overnight, but overcast skies and post-storm conditions offer the best, most saturated light for photography.
Recommendation: Use the official color map as a starting point, then cross-reference with mountain webcams and local weather forecasts to pinpoint the 3-5 day window of peak vibrancy for your target area.
For photographers and avid leaf peepers, the annual quest for Quebec’s fall colours is a high-stakes game. You envision hillsides ablaze in crimson and gold, but reality is often a frustrating near-miss: a landscape still stubbornly green or, worse, a forest of bare branches. The window for peak foliage is incredibly narrow, and a poorly timed trip can feel like a wasted opportunity. Many travel guides offer the same generic advice, suggesting a trip to Mont-Tremblant in early October and hoping for the best. This approach is a gamble, treating a predictable natural process like a lottery.
But what if you could stop gambling and start planning with precision? As a dendrologist, a specialist in the study of trees, I can tell you that the autumn spectacle is not random. It’s a carefully orchestrated shutdown process, a chemical response to a series of specific environmental cues. Trees follow a script written by temperature, light, and stress. The key to being in the right place at the right time is learning to read that script. Forget luck; this is about understanding the biology of the forest and the physics of the atmosphere.
This guide will move beyond the common platitudes. We will not just tell you *where* to go, but teach you *how* to predict the color progression yourself. We will decode the official foliage map, explore the science that makes mountains change colour first, uncover stunning alternatives to the crowded hotspots, and master the meteorological conditions—from wind and rain to the very type of clouds in the sky—that make or break a photographic expedition. You will learn to see the landscape not just as a pretty picture, but as a living system with predictable patterns.
To navigate this deep dive into the science of fall foliage, the following sections will equip you with the knowledge to plan your next Quebec autumn adventure with the precision of a field scientist. Discover the tools and techniques to ensure you capture the colours at their absolute zenith.
Summary: A Scientific Guide to Predicting Quebec’s Peak Fall Colours
- How to Use the Quebec Color Map to Plan Your Weekend?
- Why Do Trees Turn Red Earlier in the Mountains?
- Where to See Colors Without the Mont-Tremblant Traffic Jam?
- Wind and Rain: What Destroys the Foliage Season Overnight?
- Overcast vs. Sunny: Which Light Is Best for Fall Colors?
- High Clouds vs. Low Clouds: Which Predicts a Colorful Sunset?
- The Condensation Risk for Cameras Moving from AC to Humid Outdoors
- How to Photograph Quebec’s Landscapes During the Golden Hour?
How to Use the Quebec Color Map to Plan Your Weekend?
The interactive fall foliage map provided by Bonjour Québec is the single most valuable public tool for timing your trip, but most people use it superficially. Viewing it as a static snapshot is a mistake; its real power lies in analyzing its weekly progression. The map is a dynamic forecast, not just a report. To use it like a strategist, you must look for trends over time. The key is not just where the color is now, but the *velocity* at which it’s changing and moving south.
A sophisticated approach involves identifying the “color front line,” the boundary where yellow and orange are transitioning to red. In Quebec, this front typically advances 50 to 100 kilometers south per week during the peak season. By comparing the current week’s map to the previous one, you can calculate this speed and better predict when the peak will reach your desired area. For a weekend trip, your prime target should be regions marked as “midpoint” or vibrant orange. Given the typical progression, these areas are most likely to hit their crimson peak within the next 3 to 5 days—perfect timing for a Friday-to-Sunday excursion.
However, the map is a regional model. To verify its accuracy on a micro-level, you must cross-reference it with real-time data. This is where live webcams from ski resorts become indispensable. Before committing to a long drive, check the webcams for Mont Tremblant, Mont-Sainte-Anne, or Mont-Orford. They provide ground-truth validation of the map’s color ratings and can reveal subtle variations that the map’s broad strokes might miss. This combination of macro-level trend analysis and micro-level verification transforms the map from a simple guide into a powerful predictive tool.
4-Step Strategy to Master Quebec’s Interactive Fall Foliage Map
- Check the map on Thursday mornings when it updates weekly, comparing changes from the previous week to identify the ‘speed’ of color progression in your target region.
- Look for the ‘front line’ where colors transition from orange to red on the map – this typically moves 50-100km south per week in October.
- Cross-reference the official map with live webcams from ski resorts like Mont Tremblant to verify real-time conditions.
- Target areas marked as ‘orange’ (midpoint) for weekend trips, as they’ll likely hit peak within 3-5 days based on typical progression patterns.
This systematic approach allows for strategic planning, like visiting the Laurentians one weekend and the Eastern Townships the next, as the peak in the lower-elevation Townships often arrives 5-7 days later. You can effectively experience two separate peaks in a single season.
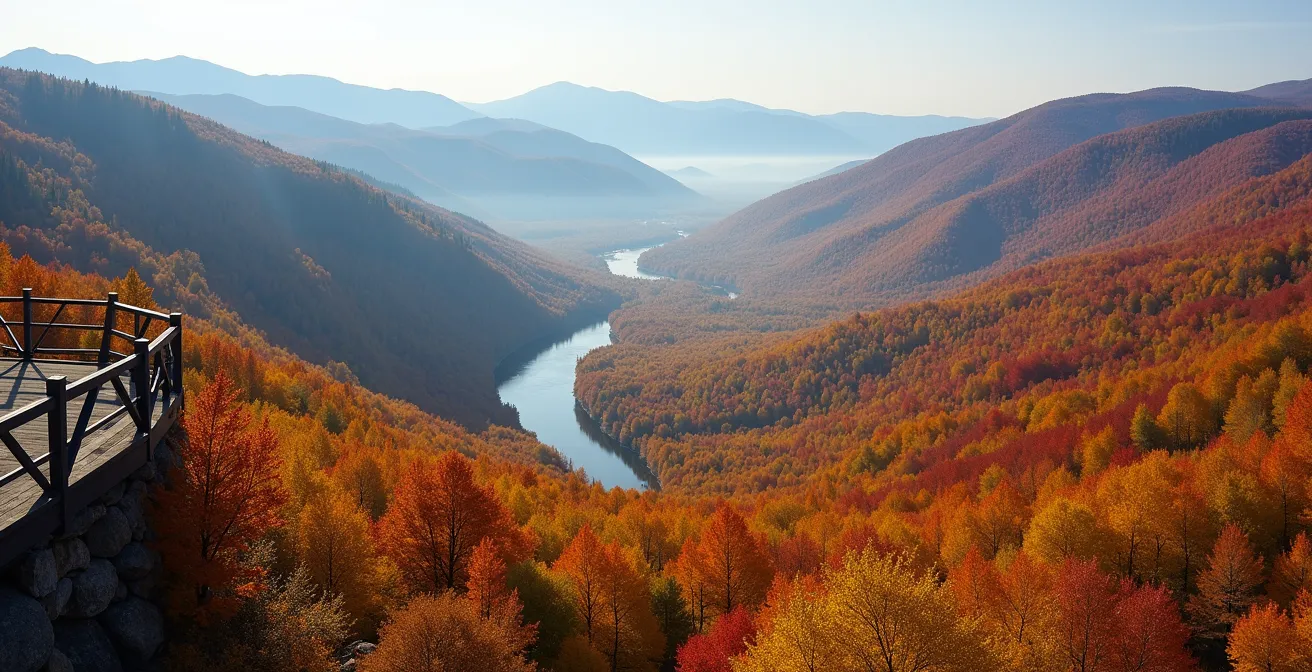
Why Do Trees Turn Red Earlier in the Mountains?
The common observation that mountains ignite with color while valleys remain green is a direct result of fundamental biology and physics. The color change is a tree’s preparation for winter, a process of energy conservation initiated by environmental triggers. The primary trigger is the combination of shortening daylight hours and, most importantly, falling temperatures. As temperatures drop, trees slow and eventually halt the production of chlorophyll, the green pigment responsible for photosynthesis. As this dominant green fades, it unmasks the yellow and orange pigments (carotenoids) that were present in the leaf all along.
The brilliant reds and purples, however, are a different story. They are created by anthocyanins, pigments produced actively in the fall by certain species like maples. This production is a stress response, believed to act as a sunscreen to protect the leaf as it salvages its final nutrients. Colder nights, particularly when followed by sunny days, are the perfect recipe for intense anthocyanin production. This is where elevation becomes critical. In Quebec’s mountains, there is a measurable 0.65°C temperature drop per 100 meters of elevation gain. This temperature gradient means that a summit can be several degrees colder than its base, triggering the entire process days or even weeks earlier.
This effect is compounded by other mountain-specific stressors. Trees on high-altitude, north-facing slopes receive significantly less direct sunlight and warmth, accelerating their shutdown. Furthermore, the thin, rocky soils and higher wind exposure on summits create a stressful environment. The trees sense these harsh conditions and initiate their protective shutdown sooner than their sheltered counterparts in the valley. This combination of a steep temperature gradient and increased environmental stress is why the fall color change cascades down a mountain, starting as a fiery crown at the peak before slowly descending to the base.
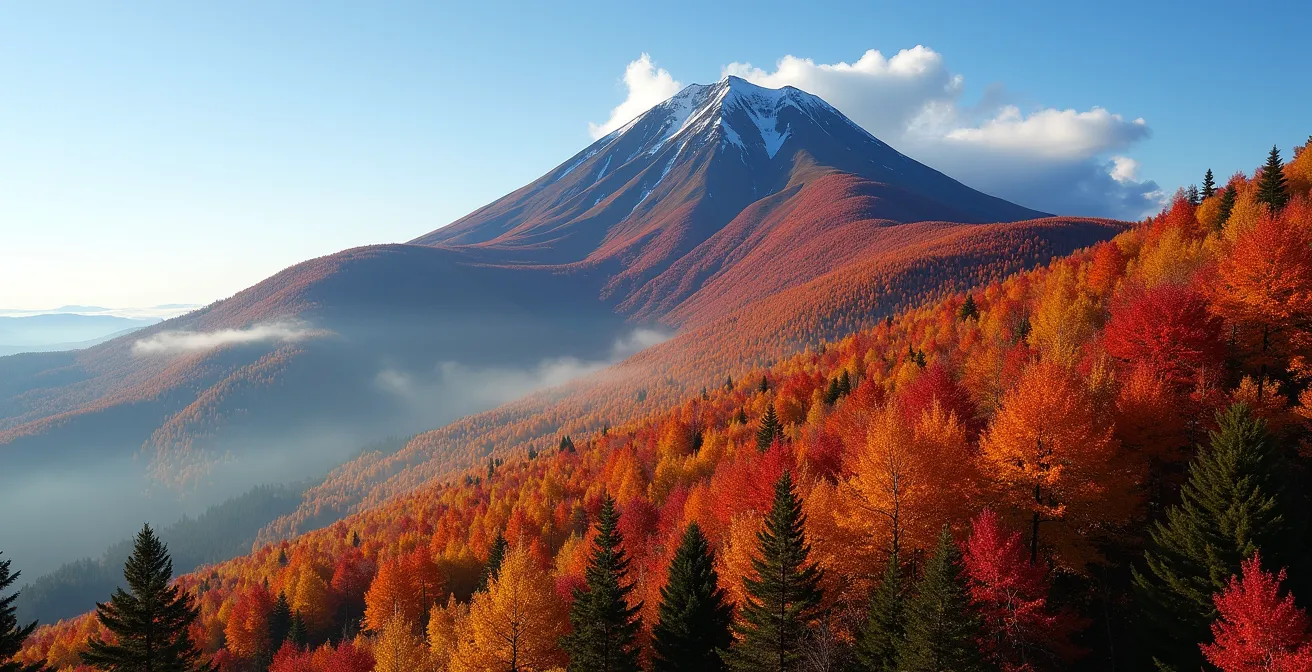
As this visual representation shows, the color change is not uniform. It’s a predictable, top-down progression driven by the microclimates created by elevation. For a photographer, this means you can “chase” the peak color by simply changing your altitude, finding vibrant reds at the summit while yellows are just emerging at the trailhead.
Therefore, a gain of just a few hundred meters in elevation can advance the color change by a week or more, providing a reliable indicator for early-season leaf peeping.
Where to See Colors Without the Mont-Tremblant Traffic Jam?
While Mont-Tremblant and the main corridors of the Eastern Townships are famous for a reason, their popularity during the short peak season can lead to frustrating traffic and crowded trails, diminishing the experience. The secret to an immersive foliage adventure in Quebec lies in its vast network of lesser-known regional parks and backroads. These areas often offer vistas that are just as spectacular but with a fraction of the visitors. Parks like the Réserve naturelle des Montagnes-Vertes or the Parc d’environnement naturel de Sutton provide extensive trail networks with stunning vantage points and can see up to 75% fewer visitors than national parks during the peak October weekends.
Finding these hidden gems requires a bit of digital scouting before you leave home. This is an active process of exploration, not passive consumption of top-10 lists. The goal is to discover routes and locations that are prized by locals but overlooked by tourist buses. A key technique is to use Google Maps in satellite view, manually tracing roads that follow rivers or ridgelines. Routes like the historic Chemin du Roy (Route 138) offer constantly changing perspectives that are impossible to appreciate from a major highway.
For photographers seeking specific color palettes, the search can become even more targeted. Intense crimsons are the signature of sugar maples, so searching for “érablières” (sugar shacks/maple groves) in regions like Beauce can lead you to fiery red hotspots. For vast seas of gold, the birch and aspen forests of Abitibi-Témiscamingue are unparalleled. Finally, don’t underestimate the power of social media as a real-time scouting tool. Searching geotags like #couleursquebec or the specific hashtag for a regional park can provide an up-to-the-minute glimpse of both color conditions and, just as importantly, crowd levels.
Your 5-Point Audit Plan for Scouting a New Fall Route
- Points of Contact: List all potential routes by tracing rivers and ridges on Google Maps satellite view and identifying regional parks on the SEPAQ alternative network.
- Collecte: Inventory existing imagery by searching Instagram geotags (#couleursquebec, park names) and Google Images for your target roads to assess their photographic potential.
- Cohérence: Compare the expected colors (e.g., maple reds, birch golds) with the region’s known tree species. Does the ‘érablière’ density in Beauce align with your goal of finding deep reds?
- Mémorabilité/émotion: Evaluate scouted photos. Do they show unique compositions (S-curves in the road, reflections in a lake) or just generic roadside trees? Prioritize routes with unique features.
- Plan d’intégration: Build a primary and a backup itinerary. If your primary route to Portneuf Regional Park is too crowded, have a pre-scouted secondary backroad nearby ready to explore.
By investing a small amount of time in digital exploration, you can design a unique itinerary that guarantees solitude and spectacular, personal discoveries far from the predictable traffic jams.
Wind and Rain: What Destroys the Foliage Season Overnight?
The most heartbreaking experience for a foliage seeker is to arrive at a location that was perfect just 24 hours prior, only to find the trees bare. This devastatingly rapid change is almost always the work of wind and rain acting on a leaf’s natural “abscission layer.” As a tree prepares for dormancy, it forms a special layer of cells at the base of the leaf stem. This layer effectively seals the leaf off from the tree. Once this layer is fully formed, the leaf is held on by only a thread of vascular tissue. It is physiologically ready to drop.
This is where weather becomes the ultimate arbiter of the season’s length. Leaves at their absolute peak of color are at their most fragile. The foliage changes fast, and the peak often lasts only about a week in any given region. A storm system with winds exceeding 40-50 km/h can strip an entire forest in a matter of hours. Therefore, monitoring the 48-hour weather forecast from a reliable source like MétéoMédia is as crucial as checking the color map. If a major wind or rain event is predicted for a region at 100% peak, you must either go immediately or accept that the show will be over when the storm passes.
However, a storm is not always a catastrophe for photographers. It can be a creative opportunity if you shift your perspective. Instead of focusing on the canopy, look down. A moderate rainstorm that brings down a multitude of leaves creates a “golden carpet” effect on the forest floor. The moisture saturates the colors of the fallen leaves, making them far more vibrant and photogenic than when they are dry and brittle. Shooting a forest floor covered in a mosaic of wet, glistening leaves is a classic and powerful autumn composition. Furthermore, immediately after a storm, you can find sheltered valleys and southeast-facing slopes that were protected from the primary northwest winds, often retaining their color when more exposed areas are bare.
This post-storm landscape offers a different kind of beauty, rich with texture and saturated color. By adapting your creative strategy, you can turn a potentially trip-ruining weather event into a unique photographic opportunity that captures the transient nature of the season.
So, while a storm may signal the end of the grand, sweeping vistas, it also marks the beginning of a more intimate and texturally rich phase of the fall photo season.
Overcast vs. Sunny: Which Light Is Best for Fall Colors?
A common misconception among amateur photographers is that a bright, sunny day is ideal for capturing fall colors. While direct sunlight can create a beautiful “stained-glass” effect when backlighting a maple leaf, it often produces harsh shadows, high contrast, and washed-out colors in wider landscape scenes. For showcasing the rich, saturated tapestry of an entire hillside, an overcast day is far superior. The layer of clouds acts as a giant natural softbox, diffusing the sunlight and casting an even, gentle light over the entire landscape. This eliminates harsh shadows and allows the camera’s sensor to capture the full, true range of colors without clipping the highlights or crushing the blacks.
Furthermore, the cool, blue-toned light of an overcast sky provides a complementary color contrast to the warm reds, oranges, and yellows of the foliage, making them appear even more vibrant. This effect is amplified if the leaves are damp from a recent rain, as the moisture increases saturation and removes dusty glare. A circular polarizing filter is an essential tool on these days, as it can cut through any remaining glare on wet surfaces and deepen the color saturation even further.
Fog and mist, common in Quebec’s river valleys on October mornings, offer another layer of photographic opportunity that is impossible in clear, sunny weather. Fog simplifies a busy scene by obscuring the background, allowing you to isolate a single tree or a small grove. It also creates a powerful sense of depth and atmosphere by layering the landscape, with foreground elements appearing sharp and distant hills fading into ethereal softness. The Jacques-Cartier and Matapédia river valleys are particularly known for this phenomenon, creating dreamlike conditions for photographers willing to get out early.
The following table, adapted from observations by Quebec photographers, breaks down the optimal use for each lighting condition.
| Light Condition | Best For | Ideal Time | Camera Settings |
|---|---|---|---|
| Sunny Days | Backlit canopy shots creating ‘stained glass’ effect through maple leaves | Early morning or late afternoon for golden light | Spot meter on leaves, +1 EV compensation |
| Overcast Days | Wide landscape views with saturated colors, no harsh shadows on wet leaves | All day – acts as giant softbox | 0 EV, polarizing filter essential |
| Fog & Mist | Isolating subjects, creating depth layers in valleys | Early morning in river valleys | +0.7 EV to maintain fog brightness |
Ultimately, there is no single “best” light. The skilled photographer understands the unique properties of each type of light and adapts their subject and composition to leverage its strengths, turning any weather condition into an advantage.
High Clouds vs. Low Clouds: Which Predicts a Colorful Sunset?
For landscape photographers, the day doesn’t end when the sun dips below the horizon. The 10 to 20 minutes *after* sunset often produce the most spectacular color, a phenomenon known as “afterglow.” However, a vibrant sunset is not a guaranteed event; it is entirely dependent on the type and altitude of the clouds present. The key to a fiery sky is having the right kind of clouds to act as a canvas for the sun’s departing rays.
The hero of a good sunset is high-altitude clouds. Thin, wispy cirrus or altocumulus clouds, typically found above 6,000 meters, are the perfect screen. Because of the Earth’s curvature, the sun’s light can still reach these high clouds long after it has disappeared from our vantage point on the ground. The light rays, traveling through a much thicker slice of the atmosphere, are scattered in a process called atmospheric refraction, which filters out the blue and green wavelengths and allows the long-wavelength reds and oranges to pass through. These are the rays that illuminate the underside of high clouds, setting them ablaze with color.
Conversely, the villain of a sunset is a low, thick deck of stratus clouds. These are common over the St. Lawrence River valley and act like a closed lid on the sky. They are too low and too thick for the light of the setting sun to get underneath them, blocking the light completely and resulting in a flat, grey, and anticlimactic end to the day. The most reliable way to predict the outcome is to observe the sky in the west about an hour before sunset. If you see a mix of clear sky near the horizon with a layer of high, thin clouds above it, your chances for a spectacular display are excellent.
Quebec Sunset Prediction Guide
- Check for high-altitude cirrus clouds 2 hours before sunset – these thin clouds at 6000m+ will catch alpenglow 20 minutes after the sun drops below the horizon.
- Avoid days with low stratus clouds common over the St. Lawrence River – these block light completely and guarantee grey endings.
- Scout locations with unobstructed western horizons, such as the shores of the St. Lawrence or a high mountain viewpoint.
- Time your shoot for 10-20 minutes POST-sunset when the sky reaches peak color saturation as light refracts through the atmosphere.
By learning to distinguish between these cloud types, a photographer can make an educated decision whether to stay out for the afterglow or pack up early, saving valuable time and energy.
The Condensation Risk for Cameras Moving from AC to Humid Outdoors
One of the most frustrating and potentially damaging issues for photographers in Quebec’s autumn is condensation. You step out of your warm chalet or car into the cool, misty morning air, and your camera lens and viewfinder instantly fog over, rendering it useless for a critical 20-30 minutes. This isn’t just an inconvenience; repeated, heavy condensation can introduce moisture into the sensitive electronics of a camera or the internal elements of a lens, leading to long-term damage.
This phenomenon is governed by a simple principle of physics: the dew point. The dew point is the temperature at which air becomes saturated with moisture and that moisture condenses into liquid water. The cool morning air in a Quebec forest is often very humid, close to its dew point. Your camera, having been in a warm, heated environment, is well above that temperature. When you bring the cold camera body and lens into this cool, humid air, its surface rapidly cools the air immediately surrounding it. If the camera’s surface temperature drops below the air’s dew point, the moisture in the air instantly condenses onto the cold glass and metal.
This risk is particularly high in Quebec during the fall, when days can be mild but evenings and mornings are crisp. It’s common to see temperatures drop from 15-20°C during the day to below 10°C at night, creating a large temperature differential. The key to prevention is acclimatization. You must allow your gear to cool down to the ambient outdoor temperature gradually, in a controlled way, before exposing it to the humid air.
Camera Condensation Prevention Protocol for Quebec Mornings
- Ziploc Technique: Before leaving your warm vehicle or chalet, place your camera and lenses inside a sealed plastic Ziploc bag. Place the sealed bag outside for 20-30 minutes. Condensation will form on the *outside* of the bag, while your gear inside slowly and safely acclimatizes.
- Emergency De-fogging: If you get caught out, you can use an activated chemical hand warmer. Secure it to the lens barrel (never the glass itself) with a rubber band to gently raise the lens’s temperature above the dew point.
- Morning Prep: Plan to begin hikes and shoots early. This not only gives you the best light but also provides a buffer for your gear to acclimatize properly.
- Understand Dew Point: Remember the formula: Quebec’s high forest humidity + a cold camera surface = instant fogging. Prevention is all about managing this temperature difference.
By taking these simple preventative steps, you can ensure your camera is ready to shoot the moment you are, never missing a fleeting moment of perfect light because of a fogged-up lens.
Key Takeaways
- Fall color is a predictable biological process triggered by decreasing temperature and light, not a random event. Understanding this science is key to accurate prediction.
- Elevation is a powerful tool: for every 100 meters you climb, the fall color timeline advances by approximately 2-3 days, allowing you to find peak colors earlier in the season.
- Light quality trumps all else for photography. An overcast day’s soft, diffused light will produce more saturated and evenly lit landscape photos than harsh, direct sunlight.
How to Photograph Quebec’s Landscapes During the Golden Hour?
The term “golden hour” refers to the period shortly after sunrise and before sunset when the sun is low in the sky, casting a warm, soft, golden light. This light is ideal for fall foliage photography because its warm tones accentuate the reds and yellows of the leaves, and its low angle creates long, dramatic shadows that add depth and dimension to the landscape. During this time, the light is directional and flattering, sculpting the terrain rather than flattening it with the harsh overhead light of midday.
However, the photographic opportunities don’t end when the sun sets. The period immediately following sunset, known as “blue hour,” offers a completely different but equally magical aesthetic. As the sky transitions to a deep, rich blue, the landscape is bathed in a cool, soft, and ethereal light. This is an exceptional time to photograph Quebec’s charming villages. The warm, artificial lights from windows and streetlamps create a powerful color contrast with the deep blue of the ambient sky, producing scenes that feel cinematic and full of atmosphere. A village like Baie-Saint-Paul or an old quarter can transform from a simple daytime scene into a magical, glowing tableau during blue hour.
To fully control the light during these transitional periods, photographers rely on filters. A circular polarizer is the single most important filter for fall photography. By rotating it, you can dramatically reduce glare from wet leaves and water surfaces, which in turn significantly increases color saturation and deepens the blue of the sky. An ND Gradient filter can also be helpful at sunrise or sunset to balance the exposure between a bright sky and a darker foreground. These tools are not for “fixing” a photo, but for creatively managing the light that enters the lens.
This table outlines the essential filters and their impact on capturing Quebec’s fall colors.
| Filter Type | Effect on Fall Foliage | When to Use | Impact Level |
|---|---|---|---|
| Circular Polarizer | Removes glare from wet leaves, deepens sky blue, increases color saturation by up to 40% | All daylight hours, especially after rain | Essential – transforms images |
| ND Gradient | Balances bright sky with darker forest floor | Sunrise/sunset shooting | Helpful but not critical |
| UV/Haze | Cuts atmospheric haze in mountain vistas | When shooting distant mountains like at Mont-Sainte-Anne | Moderate improvement |
Now that you are equipped with the scientific knowledge to predict the peak and master the light, your final step is to get out into the field and apply these principles. Start practicing your scouting, reading the weather, and observing the trees to transform your photography from guesswork to a deliberate art.