The greatest threat to your knees at Mont-Tremblant isn’t the climb up; it’s the punishing, uncontrolled descent that many hikers are unprepared for.
- Descending can multiply the force on your knee joints by two to three times your body weight with every step.
- The hard, uneven granite of the Laurentian Shield magnifies these impact forces, leading to micro-trauma and pain.
Recommendation: Shift your preparation focus from purely cardiovascular endurance to active joint load management, especially for the downhill portion of your hike.
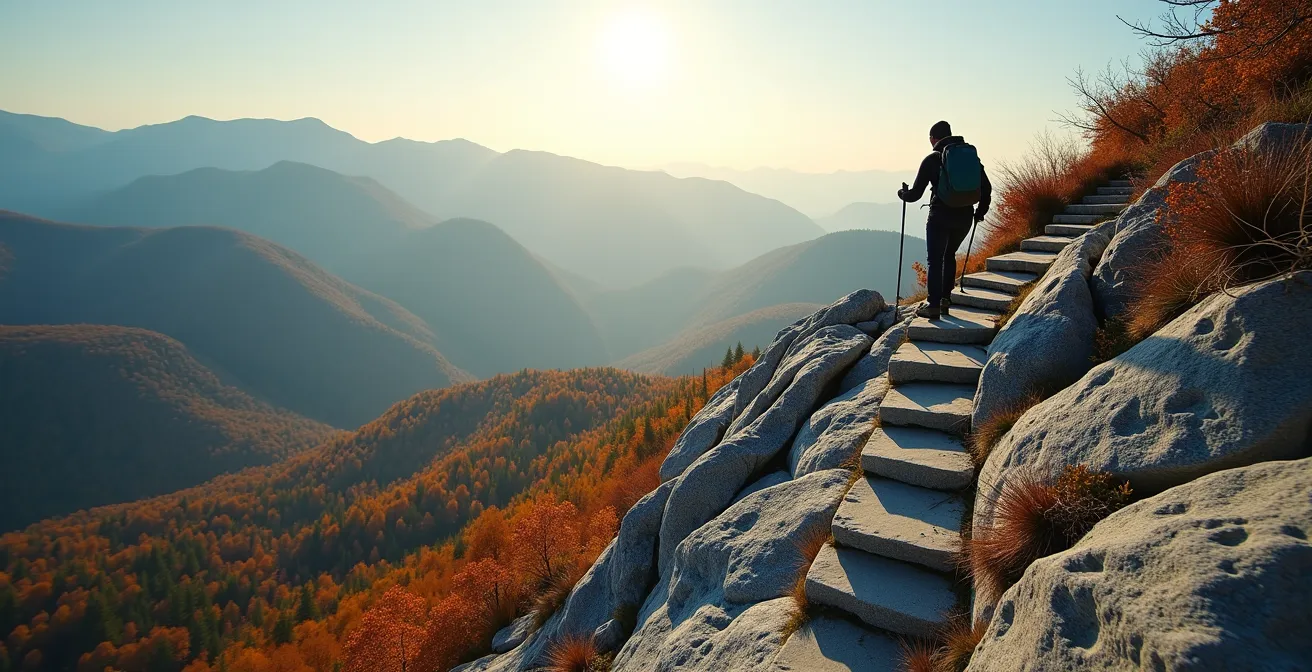
For many urban walkers, the thought of hiking Mont-Tremblant conjures images of beautiful fall colours and a rewarding physical challenge. You pack your bag, grab some water, and assume that if you’re fit enough for a long city walk, you’re ready for the mountain. This assumption is the first step toward a painful knee injury. The common advice—”wear good boots” or “pace yourself”—barely scratches the surface of what your joints will endure. The reality is that the mountain’s steep grades and, most importantly, its unforgiving terrain composed of hard Laurentian granite, present a specific biomechanical test that city legs are often not prepared for.
The problem isn’t a lack of fitness, but a lack of specific preparation. From a sports physiotherapist’s perspective, protecting your knees at Tremblant is less about brute strength and more about intelligent load management. But what if the key to an injury-free hike wasn’t just about enduring the climb, but about fundamentally rethinking how you approach the descent? What if the most dangerous part of your hike begins the moment you turn around at the summit?
This guide moves beyond generic tips to offer a preventative strategy rooted in joint health. We will deconstruct what “difficult” truly means in this environment, analyze the critical importance of hydration on a mountain with no water sources, and delve into the biomechanics of why going down is far more hazardous than going up. We’ll equip you with practical emergency knowledge, the data-backed case for using walking poles, and even how to manage hidden energy drains before you even reach the trailhead. This is your plan to conquer the peaks and return with your knees intact.
To help you navigate this essential information, this article breaks down the key strategies for protecting your joints on the mountain. The following summary outlines the topics we will cover to ensure your hike is both memorable and pain-free.
Summary: A Knee-Safe Guide to Conquering Mont-Tremblant
- Intermediate or Expert: What Does “Difficult” Really Mean at Tremblant?
- CamelBak or Bottles: How Much Water Do You Need for a 4-Hour Ascent?
- Why Going Down Is More Dangerous Than Going Up?
- What Happens If You Can’t Walk Down from the Summit?
- Walking Poles: Are They Necessary for Laurentian Trails?
- Where to See Colors Without the Mont-Tremblant Traffic Jam?
- Why the Upper Town and Lower Town Geography Exhausts Unprepared Walkers?
- How to Photograph Quebec’s Landscapes During the Golden Hour?
Intermediate or Expert: What Does “Difficult” Really Mean at Tremblant?
On paper, a trail’s difficulty rating can be misleading. At Mont-Tremblant, “difficult” is not just a measure of cardiovascular effort; it’s a direct indicator of the biomechanical stress your knees will face. The primary factor is the relentless vertical climb combined with uneven, hard-rock surfaces. Unlike a smooth, inclined treadmill, these trails demand constant micro-adjustments from your stabilizing muscles, placing significant load on your joints. For example, the most challenging routes involve a staggering 2,083 feet (about 635 metres) of elevation gain over a relatively short distance, which translates to sustained, high-intensity effort.
From a physiotherapy standpoint, the “difficulty” lies in the type of force applied. A steep ascent requires powerful concentric muscle contractions (shortening), but the descent involves eccentric loading (lengthening while under tension) to brake your momentum, which is far more damaging to muscle fibres and tendons if you’re unprepared. The trail’s surface—the hard granite of the Canadian Shield—offers zero shock absorption, magnifying every footfall.
To properly assess a trail’s risk to your knees, consider these specific Tremblant examples:
- Les Caps Trail: This is the definition of maximum knee stress. It follows ski slopes directly to the summit, meaning the grade is brutally steep and constant, offering little respite.
- Grand Brûlé: While still rated as challenging, its climb is more moderate and sustained. It provides sweeping views but is a long-haul effort requiring excellent endurance.
- Vertigo Trail: This route’s twisting, forested path demands extreme knee endurance over a 4.5 to 5-hour trek. Its name is a good indicator of the challenge.
- La Roche Trail: A good benchmark for “intermediate” difficulty, comparable to the well-known Pain de Sucre trail at Mont-Saint-Hilaire, offering a manageable challenge for a prepared hiker.
Understanding these distinctions is the first step toward respecting the mountain and choosing a path that matches your physical readiness, not just your ambition. The real expert is the one who finishes the day without pain.
CamelBak or Bottles: How Much Water Do You Need for a 4-Hour Ascent?
Hydration on a long hike seems like basic advice, but at Mont-Tremblant, it becomes a critical logistical challenge. The single most important fact every hiker must know is that the entire hiking network has zero reliable water refill points on the main summit trails. This means every drop of water you will need for your entire journey must be carried on your back from the very beginning. This non-negotiable reality immediately changes your calculation from “I should drink water” to “How much volume and weight can I carry?”
For a four-hour ascent, which can easily turn into a 6-7 hour round trip, a single 500ml bottle is dangerously insufficient. As a physiotherapist, I see dehydration as a direct precursor to injury. When you are dehydrated, your muscles fatigue faster, your cognitive function and coordination decline, and your risk of cramps and stumbles increases dramatically. A stumble on Tremblant’s rocky paths can easily lead to a twisted ankle or a fall that damages a knee. Your hydration plan is your first line of defense against fatigue-related injuries.

A good rule of thumb is to carry a minimum of 2 litres of water for a half-day hike like Tremblant, and closer to 3 litres on a hot day. A CamelBak or other hydration reservoir is often more practical than bottles, as it allows for frequent, small sips, which is more effective for maintaining hydration levels than gulping large amounts infrequently. Remember, trail conditions or a minor wrong turn can unexpectedly extend your hike. Having that extra litre of water is not dead weight; it’s your most essential piece of safety equipment.
Why Going Down Is More Dangerous Than Going Up?
Every hiker feels the burn of the ascent in their lungs and thighs. It’s tough work, but from a joint-health perspective, it’s the descent that poses the real threat. The core reason lies in a biomechanical principle: eccentric muscle contraction. When you go uphill, your muscles contract to propel you forward. When you go downhill, your quadriceps and glutes must contract eccentrically—lengthening under load—to act as brakes against gravity. This braking action generates significantly more force and micro-damage to muscle fibres and tendons than climbing up.
The numbers are startling. Research shows that hiking on an incline can put pressure equivalent to two to three times your body weight on your knees with each step. This force is magnified on the descent. This is compounded by the unique geology of the area. As physical therapy specialists analyzing backcountry knee injuries note:
The hard, uneven granite of the Laurentian Shield magnifies impact forces, creating micro-trauma in the patellar tendon.
– Physical therapy specialists, Backcountry Physio knee injury analysis
This “impact force magnification” means that even with good form, the ground itself is working against your joints. Fatigue from the ascent further compromises your form on the way down, causing you to land with a stiffer leg and transferring even more shock directly to your knee cartilage instead of absorbing it with your muscles. This is the classic recipe for post-hike knee pain and long-term damage.
Choosing your descent route is therefore a crucial strategic decision for knee preservation. A longer, more gradual trail is always a better choice than a steep, direct one, even if it adds time to your day.
| Trail | Descent Difficulty | Knee Impact | Recommended Strategy |
|---|---|---|---|
| Les Caps | Very Steep | Maximum | Avoid for descent, use Grand Brûlé instead |
| Grand Brûlé | Moderate | Medium | Better descent option, longer but gradual |
| Tour du Lac | Easy | Minimal | Safest descent for sensitive knees |
What Happens If You Can’t Walk Down from the Summit?
Reaching the summit is exhilarating, but it’s only the halfway point. For some, acute knee pain or sheer exhaustion can make the prospect of descending feel impossible. This is not just a discomfort; it’s a serious safety situation. Unlike a city park, you can’t simply call a taxi. Being prepared for this worst-case scenario is a non-negotiable part of responsible hiking at Tremblant.
Your first and most important lifeline is the Mont-Tremblant mountain patrol. Their number should be saved in your phone before you even start your hike. If you are injured or unable to continue, they are your primary contact for assistance on the trails. When you call, be prepared to give them your exact trail name and the number of the nearest trail marker to help them locate you quickly. For severe, life-threatening emergencies, 911 remains the standard.
However, there is also a “bail-out” option that you must plan for in advance: the gondola. It is crucial to check the panoramic gondola’s operating hours and seasonal schedule *before* you begin your hike. Do not assume it will be running. If you find yourself at the summit’s Le Grand Manitou lodge, exhausted and with aching knees, you have the option to purchase a one-way pedestrian lift ticket to get back to the base village. This can be a knee-saving decision that prevents a painful descent from turning into a serious injury. Think of it as an insurance policy for your joints.
Your emergency protocol should be clear:
- Save the mountain patrol number: 819-681-5911.
- Know your trail name and nearest marker.
- Confirm the gondola schedule and last descent time before you start.
- Carry a payment method for a potential one-way ticket down.
Walking Poles: Are They Necessary for Laurentian Trails?
For many urban walkers, hiking poles might seem like an accessory for “serious” mountaineers. At Mont-Tremblant, they should be considered essential safety equipment, not an option. From a physiotherapy standpoint, their benefit is not about propulsion on the way up; it’s about joint load reduction on the way down. The data is clear: using trekking poles correctly transforms you from a biped into a quadruped, distributing the punishing impact forces between your arms and legs.
This isn’t just a feeling; it’s measurable. Scientific research published in sports medicine studies shows that using poles can lead to up to a 16% reduction in knee joint loading forces, particularly during descent. On the hard, unforgiving granite of the Laurentians, that 16% is a massive saving for your cartilage and tendons over thousands of steps. They help you maintain balance on uneven terrain, preventing the small stumbles that can lead to major sprains or falls. They also encourage better posture, keeping you more upright and preventing you from hunching over as you fatigue.
Case Study: Appalachian Trail Hiker Survey
The evidence from long-distance hikers is compelling. A 2021 survey of over 1,200 Appalachian Trail hikers provided powerful insights. It found that 70% of these experienced hikers used trekking poles. More importantly, those who used a combination of stabilizing footwear and poles reported significantly fewer musculoskeletal issues. Knee injury was the single most common complaint, affecting 37% of all respondents, and the data showed that hikers who did not use poles suffered higher injury rates. This demonstrates that among those who hike the most, poles are considered a key tool for injury prevention and longevity.
To be effective, poles must be adjusted to the correct height—your elbow should be at a 90-degree angle when holding the grip with the tip on the ground. Shorten them for the ascent and, most importantly, lengthen them for the descent to allow you to plant them further in front of you, creating a stable frame to absorb impact before it reaches your knees.
Your Pre-Hike Knee Protection Checklist: Poles and Posture
- Pole Adjustment: Before starting, set your pole height. On flat ground, your elbow should form a 90-degree angle. Have a plan to shorten them for climbs and lengthen them for descents.
- Grip Technique: Practice the “hands-through-the-bottom” strap method. Your hand should go up through the strap and then grip the handle. This lets your wrist, not your fingers, bear the load.
- Posture Check: Stand tall. Are you using the poles to keep your chest up and core engaged, or are they causing you to hunch over? The goal is to improve posture, not compromise it.
- Landing Form: Take a few practice steps downhill. Focus on landing with a bent knee, allowing your quadriceps to absorb the shock. Avoid “locking” your knees on impact.
- Coordination Drill: Practice the alternating pattern (opposite arm, opposite leg) on a flat surface to make it second nature. This rhythm is key to effective load distribution on the trail.
Where to See Colors Without the Mont-Tremblant Traffic Jam?
The fall colours in the Laurentians are world-famous, but this fame comes at a price: immense crowds and traffic, especially at a marquee destination like Mont-Tremblant. For hikers concerned about knee health, a crowded trail adds another layer of risk. You’re forced into an unnatural stop-and-go pace, making it difficult to find a rhythm, and the pressure to move aside can lead to missteps on uneven ground. Fortunately, the region offers spectacular alternatives that are gentler on both your joints and your patience.
Exploring these lesser-known parks allows you to enjoy the same stunning autumn palette with more moderate terrain and fewer people. Consider these knee-friendly options for your fall colour quest:
- Domaine Saint-Bernard: Located right next to Tremblant, this protected area offers beautiful trails with much gentler grades and fantastic views, making it an ideal choice for a less strenuous day.
- Parc Régional Val-David-Val-Morin: A local favourite known for its accessible network of trails that wind through forests and alongside cliffs, providing incredible fall scenery without the steep climbs of Tremblant.
- Montagne d’Argent: Another excellent alternative near La Conception, this spot offers a moderate challenge with rewarding lookouts and is significantly less crowded than its famous neighbour.
- Scenic Drive Option: For days when your knees need a complete rest, the scenic Chemin du Nordet drive offers breathtaking vistas. You can pair it with short, flat walks to various lookouts along the way.
A local hiker’s insight on timing is also crucial: “July is when most Quebecers take summer holidays. Try early morning or late afternoon arrivals to guarantee parking. Mid-May to mid-July brings mosquitoes and black flies—always carry bug spray. August through October offers pleasant weather with significantly reduced bug harassment.” For peak colours without the weekend rush, aim for a mid-week visit in late September or early October. This strategy allows you to experience the best of the season without the physical and mental stress of navigating a crowd.
Why the Upper Town and Lower Town Geography Exhausts Unprepared Walkers?
One of the most underestimated factors contributing to hiking injuries at Mont-Tremblant is pre-hike fatigue. The challenge to your leg muscles doesn’t start at the trailhead; it begins the moment you park your car. The sprawling, colourful pedestrian village at the base of the mountain is built on a steep slope, and the walk from the lower parking lots to the main gondola or trailheads is a significant physical effort in itself.
For an urban walker accustomed to flat sidewalks, this initial steep incline can act as an unwelcome “warm-up” that saps energy and puts premature strain on the calf and quad muscles. You might arrive at your chosen trail already feeling a bit winded and with your legs slightly fatigued. Starting a demanding 4-hour hike in this state is a recipe for poor form, increased muscle strain, and a higher likelihood of injury. The large trail information signs detailing difficulty levels are located within the village, but by the time you reach them, you’ve already paid a physical toll.
Fortunately, there are simple, energy-saving strategies built into the resort’s design. The most effective solution is to use the free Cabriolet lift, an open-air gondola that connects the lower and upper sections of the village. Bypassing this steep walk is the single best thing you can do to conserve energy for the real hike.
This table breaks down how you can strategically manage your energy from the moment you arrive to the moment you return.
| Village Section | Elevation Change | Energy-Saving Option | Time Saved |
|---|---|---|---|
| Parking to Village | Steep incline | Free Cabriolet lift | 15 minutes |
| Village to Trailhead | Moderate | Follow flat route markers | 10 minutes |
| Summit Return | 875m descent | Panoramic gondola (paid) | 60-90 minutes |
By treating the village transit as a logistical step to be optimized rather than a casual stroll, you arrive at the trailhead with fresh legs and a full energy reserve, ready to be deployed safely and effectively on the mountain itself.
Key Takeaways
- The descent is biomechanically more dangerous for your knees than the ascent due to high-impact eccentric muscle loading.
- Walking poles are not optional; they are essential equipment that can reduce knee joint forces by up to 16%.
- Effective preparation includes managing pre-hike fatigue by using the Cabriolet lift to bypass the steep village walk.
How to Photograph Quebec’s Landscapes During the Golden Hour?
Hiking during the “golden hour”—the period shortly after sunrise or before sunset—offers photographers the chance to capture Quebec’s landscapes in magical, warm light. However, this pursuit combines the physical demands of hiking with the unique safety challenges of diminishing light. From a joint health and safety perspective, a golden hour hike requires even more meticulous planning than a standard daytime trek, especially concerning the descent.
As darkness falls, your visibility is reduced, drastically increasing the risk of a misstep on Tremblant’s rocky and root-filled trails. A simple stumble can become a serious fall, and navigating in the dark puts immense strain on your concentration and proprioception, which are already taxed by fatigue. The number one rule for any late-afternoon hike is to carry a dedicated, high-lumen headlamp. A phone flashlight is dangerously inadequate for illuminating the technical terrain you will face on the descent.
Your safety checklist for a golden hour hike must be strict:
- Check the *true* sunset time: Remember that in a dense forest, the trail will become dark up to 30 minutes before the official sunset time. Plan your turnaround time accordingly.
- Verify the last gondola: If you’re counting on the gondola for your descent, you must confirm the time of the last cabin down at Customer Service before you start. Missing it could mean a long, unexpected hike down in the pitch black.
- Choose your viewpoint wisely: For a safer golden hour experience, the La Roche lookout is the most accessible and popular option. For a more challenging hike with a safer descent path than other expert trails, the lookout on the Vertigo trail can be an option for well-equipped hikers.
The goal is to return with stunning photos and healthy knees. This means accepting that the descent will be slower and more deliberate in low light, and packing the necessary gear to do it safely. Rushing down a dark trail to beat the clock is one of the fastest ways to get injured.
Begin your preparation now by assessing your gear, physical readiness, and knowledge of the mountain to ensure a hike that is as safe as it is spectacular.